
Integrations
Salesforce Integration
The ClearStaq Salesforce package sends statements for analysis and receives the completed results on the same Salesforce record automatically.
Available on all plans — connect it from any tier.
Start here:
- First installation — install the package, authorize Salesforce, and add ClearStaq to your record pages.
- Package already installed — upgrade, then authorize once from Analyzer settings on a record.
What it does
Files submitted on a Salesforce record are sent to ClearStaq for analysis. When the analysis completes, the results return automatically to the matching Salesforce record and appear in the ClearStaq dashboard there. You don't need field mapping or a manual push for this. Documents arriving this way also appear in ClearStaq with a "Source: Salesforce" badge.
Sending web app analyses to Salesforce fields is a separate, optional feature. See Optional: Push to Salesforce.
Package already installed
You don't need to repeat the first-installation steps.
- Upgrade the package with the latest install link in the ClearStaq app under Settings → Integrations → Salesforce → Setup guide. Choose Production or Sandbox to match the org.
- Open a record that has a ClearStaq analysis, click Open Dashboard in the ClearStaq panel, then click the gear icon (Analyzer settings). Analyzer Settings opens. ClearStaq Dashboard in the App Launcher doesn't open these settings after setup.
- Leave the API Key field blank to keep the saved key. Leave your automation settings as they are if they're correct.
- Under Salesforce Authorization, click Authorize Salesforce (or Reauthorize Salesforce, if shown).
- In the ClearStaq window, sign in to the same Salesforce org if asked. On the ClearStaq Integration access screen, click Allow.
- Return to Analyzer Settings. The status updates on its own. You can also click Check status.
- Confirm the status shows Connected with the right environment: Production org for production, or Sandbox org for a sandbox. Then click Save Settings.
- Test with one statement: see Confirm results arrive.
Start authorization from the org you want to connect. An approval for a different org cannot deliver results to this one.
First installation
- Generate an API key (ClearStaq owner or admin): Settings → Integrations → API Keys → Generate New Key. The key starts with
cg_live_and must include theanalyses:writescope. Keys generated there include it by default. Copy the key. You only see it once. - Install the package: use the latest install link in the ClearStaq app under Settings → Integrations → Salesforce → Setup guide. Choose Production or Sandbox to match the org.
- Assign the permission set: in Salesforce, assign ClearStaq Analysis Access to every user who will use ClearStaq, including the administrator who will authorize it.
- Run the setup wizard (Salesforce administrator): open the App Launcher, search for ClearStaq Dashboard, and open it. The setup wizard opens automatically the first time.
- Paste the API key into API Key.
- Under Salesforce Authorization, click Authorize Salesforce.
- In the ClearStaq window, sign in to the same Salesforce org if asked. On the ClearStaq Integration access screen, click Allow.
- Return to the wizard. The status updates on its own. You can also click Check status.
- Confirm the status shows Connected with the right environment: Production org for production, or Sandbox org for a sandbox.
- Keep or choose your normal Automation Trigger and other settings, then click Complete Setup. The button stays disabled until the status is Connected.
- Add ClearStaq to your record pages: open an Opportunity record, click the gear icon, then Edit Page. In the Lightning App Builder, drag clearStaqTab onto the layout, then click Save and Activate. Repeat for each object your team uses (Opportunity, Lead, Account).
- Test with one statement: see Confirm results arrive.
You don't need to create an External Client App in Salesforce. The package includes the ClearStaq Integration app.
Authorize Salesforce → Allow → Connected
Both routes use the same approval. An administrator starts it in ClearStaq settings in Salesforce, approves once, and waits for Connected.
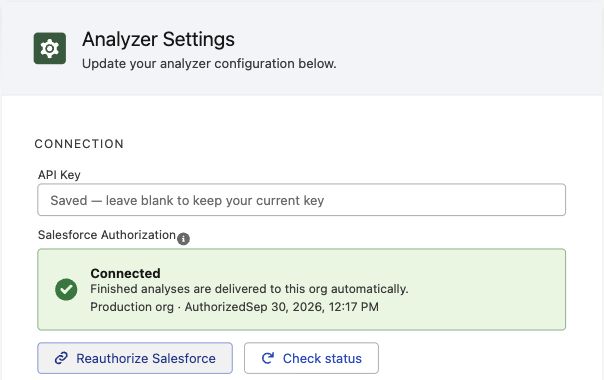
Authorize Salesforce, in Analyzer Settings. This org is already connected, so the button reads Reauthorize Salesforce. Before the first approval, it reads Authorize Salesforce.
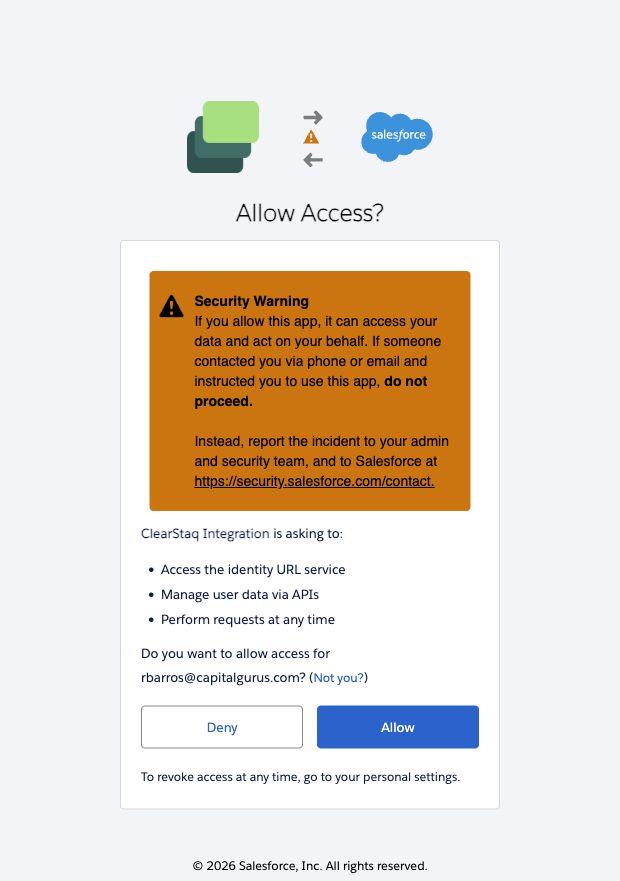
Allow. Check that you're signed in to the org you're setting up, then click Allow.
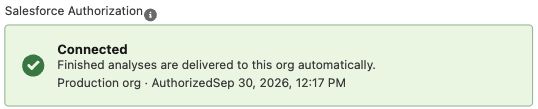
Connected. Check that the environment matches this org: Production org or Sandbox org.
Confirm results arrive
Upload one statement on a Salesforce record, then check the ClearStaq panel on that record:
- File Status shows the file as Success.
- Click Open Dashboard, then confirm Overview and Balance Insights show values for the statement.
- If the record was already open, click Refresh to load the new results.
A file marked as processed in ClearStaq isn't enough on its own. Setup is working only when the values appear on the Salesforce record.
One authorization per org
- Each ClearStaq workspace connects to one Salesforce org at a time. To keep production connected while testing a sandbox, use a separate ClearStaq workspace and its API key for the sandbox. An administrator authorizes the target org during setup; individual users and analyses don't need their own authorization.
- ClearStaq renews its access automatically when it expires. Results keep arriving after the user who uploaded the file signs out.
- If the wizard shows Reauthorization needed, an administrator must click Reauthorize Salesforce and approve again. This can follow a revoked authorization, a disconnect in ClearStaq, or a change to the Salesforce org domain. Results waiting for authorization resume after reconnection. Temporary connection errors can be retried with Check status.
Optional: Push to Salesforce
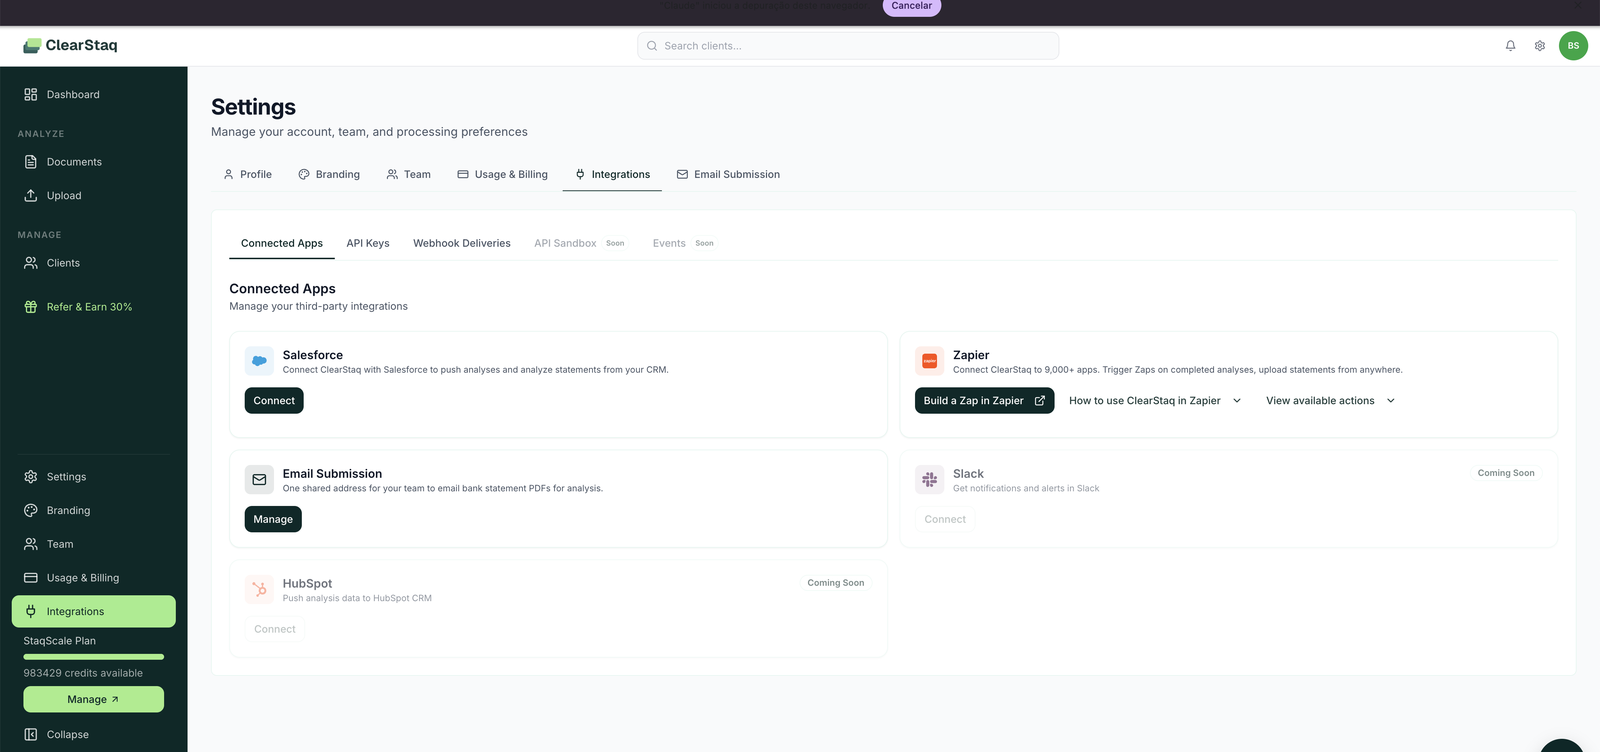
The package returns results to Salesforce on its own. Use Push to Salesforce only if you also want to send web app analyses to Salesforce fields you choose. Set it up in the ClearStaq web app under Settings → Integrations → Connected Apps → Salesforce, where you map the fields.
It uses the same authorized connection. Disconnecting Salesforce in ClearStaq also pauses the package's automatic deliveries until an administrator reconnects.
Troubleshooting
- Browser blocked the ClearStaq window: click Open ClearStaq to approve access in the wizard, then approve.
- "This link has expired" or "Authorization was cancelled": return to the setup wizard and click Authorize Salesforce again.
- API key rejected: the key must start with
cg_live_, includeanalyses:write, and be created by a ClearStaq workspace owner or admin. Generate a new key if needed. - "Administrator approval required": the Salesforce user who approves must be a Salesforce administrator (Customize Application or Modify All Data).
- "Authorized for a different org": check that you signed in to the org you are setting up. If this ClearStaq workspace is already connected to another Salesforce org, use a separate workspace and its API key for this org; authorizing again cannot replace the other active connection from the package setup.
Monitoring
- Documents submitted from Salesforce appear in the Documents list like any other upload, with full analysis tabs.
- Failed submissions show as Failed status in the Documents list — the most common causes are non-statement attachments and password-protected PDFs being pushed from the CRM flow.
- API activity from the Salesforce package is visible per key under API Keys (last-used timestamps).
Why teams run intake this way
- Underwriters never tab-switch: submission, analysis, and decision data live on the Salesforce record.
- Analyses are linked to the right deal automatically — no manual client assignment.
- Salesforce reporting/dashboards can include ClearStaq fields (fraud score, true revenue, positions) once mapped with the optional Push to Salesforce connection.
FAQ
Which Salesforce editions are supported? Any edition that supports installed packages and API access (Professional with API add-on, Enterprise, Unlimited).
Does each analyzed statement still cost a credit? Yes — same metering as every other intake method.
Can I restrict who on my team manages the integration? Yes — the Integrations permission is a per-member toggle under Settings → Team.
We're on HubSpot, not Salesforce. HubSpot is on the roadmap (visible as Coming Soon under Integrations). Meanwhile, the API and Zapier cover custom CRM flows today.